Free pattern · Knitting

Anny

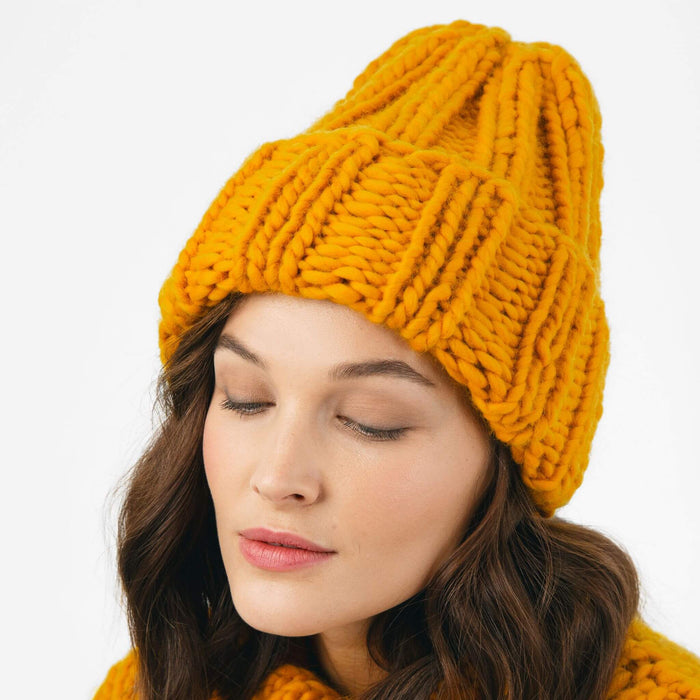
A chunky English rib hat with a fold-up brim, knitted in the round from a single skein of FACES on 10 mm needles.

  • Intermediate
  • 2–3 hours
  • In the round
  • English rib
Size
Head 53–57 cm · One size
Yarn
FACES · 1 skein, 200 g / 100 m
Needles
Circular 10 mm, 60 cm
Gauge
6 × 10 = 10 cm
Save
Available in

01

Materials

FACES ORCHID TINT

FACES · 1 skein, 200 g / 100 m

$26.99

Colour: ORCHID TINT

Tools

Needles
Circular 10 mm, 60 cm
Tapestry needle
for weaving in ends
Felting needle
optional, to secure the ends

02

Size

Head 53–57 cm · One size

Anny hat schematic: finished hat 33 cm high × 22 cm wide
MeasurementOne size
Head circumference53–57 cm
Finished hat (height / width)33 cm / 22 cm

03

Gauge

6

stitches in 10 cm

10

rows in 10 cm

10

mm needles

In English rib, worked in the round.

04

Pattern

Tick steps as you go. Your progress is saved on this device.

01Cast on

  1. Using 10 mm circular needles, loosely cast on 28 stitches using the traditional method.
  2. Join the stitches to work in the round, pulling the excess cable out to the sides for convenience. Place a marker at the beginning of the round, if needed.

02Rounds 1–2

  1. Round 1: make a yarn over on the right needle by bringing the working yarn over it from the top, then slip the first stitch from the left needle without knitting it. The work is now joined in the round.
  2. Purl the second stitch so that the right leg of the purl stitch lies behind the working needle. Repeat around: yarn over and slip 1, purl 1.
  3. Round 2: knit the first stitch together with its yarn over, so that the right leg of the knit stitch lies in front of the working needle.
  4. Make a yarn over and slip the second stitch (a purl stitch) without knitting it, inserting the needle through the back leg; the right leg of the slipped stitch lies in front of the working needle. Repeat around: knit 1 together with its yarn over, yarn over and slip 1 purl stitch.

03Body in English rib

  1. Round 3 and all odd rounds: make a yarn over and slip the first stitch (a knit stitch) without knitting it; the right leg of the slipped stitch lies in front of the working needle.
  2. Purl the second stitch (a purl stitch) together with its yarn over, so that the right leg of the purl stitch lies behind the working needle. Repeat around: yarn over and slip 1 knit stitch, purl 1 together with its yarn over.
  3. Round 4 and all even rounds: knit the first stitch (a knit stitch) together with its yarn over, so that the right leg of the knit stitch lies in front of the working needle.
  4. Make a yarn over and slip the second stitch (a purl stitch) without knitting it, inserting the needle through the back leg; the right leg of the slipped stitch lies in front of the working needle. Repeat around: knit 1 together with its yarn over, yarn over and slip 1 purl stitch.
  5. Repeat these two rounds until you have knitted 33 rounds (approximately 33 cm), then start shaping the crown.

04Crown

  1. Round 34: knit each knit stitch together with its yarn over and purl each purl stitch as usual. This round is worked as a standard 1×1 rib (knit 1, purl 1).

Tip · For a sharper crown, knit one more round, knitting every two stitches together (both knit and purl stitches are worked together as a knit stitch).

05Finishing

  1. Cut the working yarn, leaving a tail of about 10 cm. Thread it onto a tapestry needle and pass it through all the remaining stitches, slipping them off the needles as you go.
  2. Pull the yarn tight to close the crown neatly and secure it with 2–3 stitches.
  3. Tie a knot, weave the tail discreetly into the fabric and trim the excess. This is the inside of the hat, so the stitches and the woven-in tail will not be visible.
  4. Turn the hat right side out and fold up the brim.
  5. Thread the tail left from the cast-on onto the tapestry needle and weave it neatly into the edge of the hat, passing it through the cast-on stitches a few times. Trim any excess yarn.

Tip · For extra security, lightly felt the end of the yarn into the fabric with a felting needle so it stays in place.

Done!

Share your work with #thewoolcatcher

05

Video lessons

Short lessons for the techniques in this pattern.

How to make the first stitch

How to cast on

Knit stitch

Purl stitch

1×1 ribbing

How to decrease

Stuck on a step?

Write to us and we will help you finish.

hello@thewoolcatcher.com

Use the contact form

A new free pattern every two weeks

Straight to your inbox. Unsubscribe anytime.
FACES ORCHID TINT

$26.99